Router guide and configuration

Hitron router guide (Chita and CGNV4)

This guide will tell you everything you need to know about your Hitron router and how to configure it.

Don't have a Hitron router? Select your router below:

Hitron router CGNV4

Hitron CGNV4

Hitron router Chita

Hitron Chita

In this article

About your router

Find out everything you need to know about your router here.

Hitron Chita

Before you begin, please check your Hitron box came with the following equipment:

  • 12v 3.5 Amp (42W) power adapter for UK mains
  • RJ45 Ethernet cable (1.8 metres long)

About your Hitron Chita router


IT Equipment

Cable modem to connect your devices to the Internet.

Wireless

WLAN supporting dual concurrent band wireless ‘n’ at 2.4GHz and 5GHz and wireless ‘ac’ at 5GHz.Both bands use IEEE 802.11n/ac WiFi access and are backward compatible with A/B/G devices.

If you’ve chosen to take advantage of one of our multi-static IP address options (e.g. 5 or 13 static IP addresses), in addition to the VMB supplied Hitron router, you will require a customer provided router to enable WiFi capability.

Wired Devices

Gigabit LAN switch with 4 Gigabit Ethernet and 2 RJ11 phone line ports

Security

Configurable software firewall for setting filters and controls.

About your hitron router

Hitron CGNV4

Before you begin, please check your Hitron box came with the following equipment:

  • 12v 2.5 Amp (30W) power adapter for UK mains
  • RJ45 Ethernet cable (1.8 metres long)

About your Hitron CGNV4 router


IT Equipment

Cable modem to connect your devices to the Internet.

Wireless

WLAN supporting dual concurrent band wireless ‘n’ at 2.4GHz and 5GHz and wireless ‘ac’ at 5GHz.Both bands use IEEE 802.11n/ac WiFi access and are backward compatible with A/B/G devices.

If you’ve chosen to take advantage of one of our multi-static IP address options (e.g. 5 or 13 static IP addresses), in addition to the VMB supplied Hitron router, you will require a customer provided router to enable WiFi capability.

Wired Devices

Gigabit LAN switch with 4 Gigabit Ethernet and 4 RJ11 phone line ports

Security

Configurable software firewall for setting filters and controls.

2 Port - Hitron CGNV4-BIZ

Hitron 2 port router

4 Port - Hitron CGNV4-FX4

Hitron 4 port router


Status lights and control buttons

Find out what the status lights and control buttons on your router mean here.

Hitron Chita (2 Port and 4 Port)

Hardware Connections


RESET

TEL 1

TEL 2

Use this button to reboot or reset your CHITA to its factory default settings.

To reboot the CHITA, press the button and hold it for less than five seconds.The CHITA restarts, using your existing settings.

To reset the CHITA, press the button and hold it for more than ten seconds.All user-configured settings are deleted, and the CHITA restarts using its factory default settings.

Use these ports to connect your analog your phones for VoIP services, 

using cables with RJ11 connects


LED

Status

Description


POWER

Hitron router power light

DS

Hitron router DS green
Hitron router blue light
Hitron router DS black light

US

Hitron router green light
Hitron router blue light

DS/US

Hitron router green and blue light

STATUS

Hitron router green light

Ethernet

Hitron router green light
Hitron router blue light

2.4GHZ

Hitron router green light

5GHZ

Hitron router green light

TEL1

TEL2

WPS

Off

 Green, steady

Green, blinking

 Green, steady

Blue

Off

Green, blinking

 Green, steady

Blue

Off

Green or Blue blinking in unison

Blinking

ON

Off

 Green, steady

 Blue, steady

Off

 Green, steady

Green, blinking

Off

 Green, steady

Green, blinking

Off

Blinking

On

Off

Bi-Color Blinking

 Green, steady

 Red, Blinking

The CHITA is not receiving power

The CHITA is receiving power.

The CHITA is searching for a downstream frequency on the CABLE connection.

The CHITA has successfully located and locked onto a downstream frequency on the CABLE connection.

The CHITA is engaged in channel bonding on the downstream connection.

There is no downstream activity on the CABLE connection.

The CHITA is searching for an upstream frequency on the CABLE connection

The CHITA has successfully located and locked onto a upstream frequency on the CABLE connection.

The CHITA is engaged in channel bonding on the upstream connection

There is no upstream activity on the CABLE connection.

The CHITA is downloading firmware. A reboot will occur upon successful completion.

The CHITA’s cable modem is registering with the service provider’s CMTS.

The CHITA’s cable modem has successfully registered with the service provider and is ready for data transfer.

The CHITA’s cable modem is registering with the service provider’s CMTS.

The CHITA’s cable modem has successfully registered with the service provider and is ready for data transfer.

The 2.4GHz wireless network is enabled, and data is being transmitted or received over the 2.4GHz wireless network.

The 2.4GHz wireless network is not enabled.

The 2.4GHz wireless network is enabled, and no data is being transmitted or received over the 2.4GHz wireless network.

The 2.4GHz wireless network is enabled, and data is being transmitted or received over the 2.4GHz wireless network.

The 5GHz wireless network is not enabled.

The 5GHz wireless network is enabled, and no data is being transmitted or received over the 5GHz wireless network.

The 5GHz wireless network is enabled, and data is being transmitted or received over the 5GHz wireless network.

No telephone is connected to the relevant Line port.

A telephone is connected to the relevant Line port, and is off-hook.

A telephone is connected to the relevant Line port, and is on-hook.

WPS is OFF.

The CHITA’s WPS is processing.

The CHITA’s WPS is in linked status.

Error or Failure had occurred in the CHITA’s WPS.

Please note:

*The USB port on your router will not be available and has been deactivated.
**If you’ve already got a Hitron Chita router from us and want to take advantage of one of our multi-static
IP address options (e.g. 5 or 13 static IP addresses), then you’ll need an additional router to enable the full WiFi capability. You can purchase the additional router from anywhere.


2 Port: Hitron CGNV4-BIZ

The lights indicate the router is operating correctly. If you move or unplug your equipment, please check the status of the lights to ensure that things are working as they should. 

Hitron router

LED: Downstream

LED downstream router lights

Green, flashing: The router is searching for a downstream frequency on the CABLE connection.

Green, steady: The router has successfully located and locked onto a downstream frequency on the CABLE connection.

Blue: The router is engaged in channel bonding on the downstream connection.

Off: There is no downstream activity on the CABLE connection.

LED: Upstream

Green, flashing: The router is searching for a downstream frequency on the CABLE connection.

Green, steady: The router has successfully located and locked onto an upstream frequency on the CABLE connection.

Blue: The router is engaged in channel bonding on the upstream connection.

Off: There is no upstream activity on the CABLE connection.

LED: Status

Hitron LED status

Flashing: The router’s cable modem is registering with the service provider’s CMTS.

On: The router’s cable modem has successfully registered with the service provider and is ready for data transfer.

LED: LAN

Hitron LED Lan

Off: No device is connected to one of the LAN ports.

Green, steady: A device is connected to one of the LAN ports via a Fast Ethernet (100Mbit/s) link, but is not transmitting or receiving data.

Blue, steady: A device is connected to one of the LAN ports via a Gigabit Ethernet (1000Mbit/s) link, but is not transmitting or receiving data.

LED: Wireless 2.4 GHZ**

Hitron LED wireless 2.4

Off: The 2.4GHz wireless network is not enabled.

Green, steady: The 2.4GHz wireless network is enabled and no data is being transmitted or received over the 2.4GHz wireless network.

Green, flashing: The 2.4GHz wireless network is enabled and data is being transmitted or received over the 2.4GHz wireless network.

LED: Wireless 5 GHZ**

Hitron LED wireless 5 GHZ

Off: The 5GHz wireless network is not enabled.

Green, steady: The 5GHz wireless network is enabled and no data is being transmitted or received over the 5GHz wireless network.

Green, flashing: The 5GHz wireless network is enabled and data is being transmitted or received over the 5GHz wireless network.

Line 1 & 2

Use these ports to connect your analogue phones for VoIP services, using cables with RJ11 connectors.

RESET

Use this button to reboot or reset your router to its factory default settings. To reboot: press the button and hold it for less than five seconds. The router restarts, using your existing settings. To reset: press the button and hold it for more than ten seconds. All user-configured settings are deleted, and the router restarts using its factory default settings.

LAN 1, 2, 3 and 4

Use these ports to connect your computers and other network devices, using Category 5 or 6 Ethernet cables with RJ45 connectors.

WPS/PBC**

Press this button to begin the WiFi Protected Setup. (WPS) Push-Button Configuration (PBC) procedure. Press the PBC button on your wireless clients in the coverage area within two minutes to enable them to join the wireless network.

*Please note: The USB port on your router will not be available and has been deactivated.

**If you’ve chosen to take advantage of one of our multi-static IP address options (e.g. 5 or 13 static IP addresses), in addition to the VMB supplied Hitron router, you will require a customer provided router to enable WiFi capability.


4 Port: Hitron CGNV4-FX4

The lights indicate the router is operating correctly. If you move or unplug your equipment, please check the status of the lights to ensure that things are working as they should. 

Hitron router

LED: Downstream

LED Downstream

Green, flashing: The router is searching for a downstream frequency on the CABLE connection.

Green, steady: The router has successfully located and locked onto a downstream frequency on the CABLE connection.

Blue: The router is engaged in channel bonding on the downstream connection.

Off: There is no downstream activity on the CABLE connection.

LED: Upstream

Green, flashing: The router is searching for a downstream frequency on the CABLE connection.

Green, steady: The router has successfully located and locked onto an upstream frequency on the CABLE connection.

Blue: The router is engaged in channel bonding on the upstream connection.

Off: There is no upstream activity on the CABLE connection.

LED: Status

Flashing: The router’s cable modem is registering with the service provider’s CMTS.

On: The router’s cable modem has successfully registered with the service provider and is ready for data transfer.

LED: Wireless 2.4 GHZ**

Off: The 2.4GHz wireless network is not enabled.

Green, steady: The 2.4GHz wireless network is enabled and no data is being transmitted or received over the 2.4GHz wireless network.

Green, flashing: The 2.4GHz wireless network is enabled and data is being transmitted or received over the 2.4GHz wireless network.

LED: Wireless 5 GHZ**

Off: The 5GHz wireless network is not enabled.

Green, steady: The 5GHz wireless network is enabled and no data is being transmitted or received over the 5GHz wireless network.

Green, flashing: The 5GHz wireless network is enabled and data is being transmitted or received over the 5GHz wireless network.

Line 1, 2, 3 and 4

Use these ports to connect your analogue phones for VoIP services, using cables with RJ11 connectors. Our engineers will also provide adaptors where required.


Green flashing - Telephone line is active on a call or off the hook

Green Steady- Telephone line is active but not in use

Off - Telephone line port not enabled

RESET

Use this button to reboot or reset your router to its factory default settings. To reboot: press the button and hold it for less than five seconds. The router restarts, using your existing settings. To reset: press the button and hold it for more than ten seconds. All user-configured settings are deleted, and the router restarts using its factory default settings.

LAN 1, 2, 3 and 4

Use these ports to connect your computers and other network devices, using Category 5 or 6 Ethernet cables with RJ45 connectors. If the light is green, it will transmit up to 100Mbps. If it is orange, it will transmit up to 1Gbps.

WPS/PBC**

Press this button to begin the WiFi Protected Setup. (WPS) Push-Button Configuration (PBC) procedure. Press the PBC button on your wireless clients in the coverage area within two minutes to enable them to jointhe wireless network.

Please note:

*The USB port on your router will not be available and has been deactivated.

**If you’ve already got a Hitron router from us and want to take advantage of one of our multi-staticIP address options (e.g. 5 or 13 static IP addresses), then you’ll need an additional router to enablethe full WiFi capability. You can purchase the additional router from anywhere


Setting up LAN, Static IP and WAN IP

Watch the video below to find out how to configure your Hitron router.

This video will show you how to set up LAN, configure single or multiple Static IPs and how to find information on your WAN IP address.

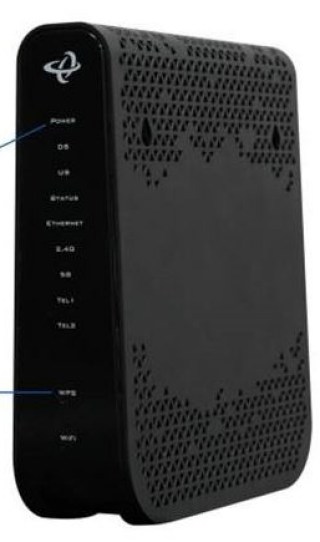
We'll install the router for you but to ensure your router is running as it should, please check the lights. See the section below to learn more about the status lights and control buttons on your router.


Additional configuration

Select from the additional configuration settings below.


Still need help?